Sometimes even though you have installed the AMD Ryzen Master Drivers properly, it might show an error “Ryzen Master Driver not installed properly” when you launch the Ryzen Utility. This error happens due to various reasons.
Here is a screenshot of how the Ryzen Master Error message will look on your Windows-based computer if AMD Ryzen Master was not installed properly.
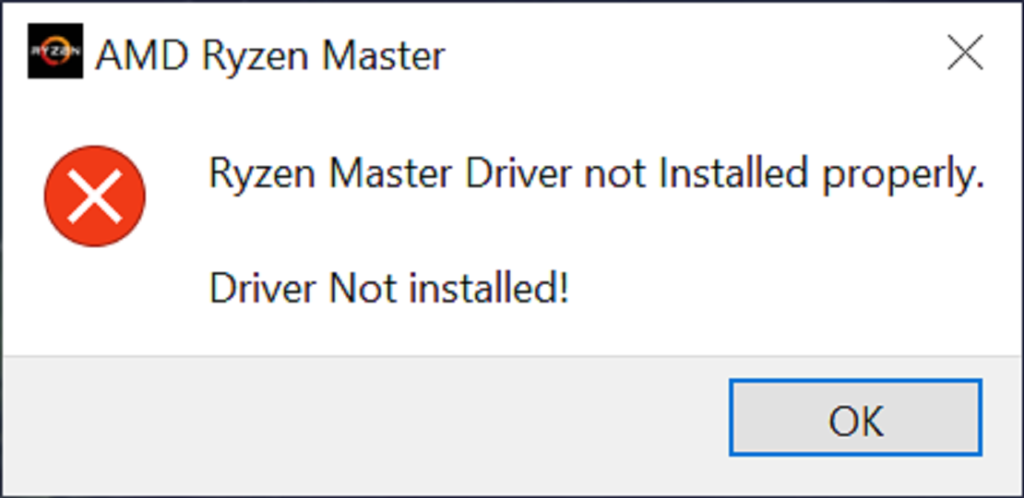
Ryzen Master Driver not installed properly Error
If you’re facing issues while installing the Ryzen Master Driver, you’re not alone. Many users encounter the “Ryzen Master Driver not installed properly Error”, which can be frustrating and can hinder your PC’s performance. However, this error can be easily resolved, and in this section, we’ll guide you through the process.
Whether you’re installing the Ryzen Master Driver for the first time or reinstalling it, a common error message you might encounter is “Ryzen Master Driver not installed properly Error”. This error can be caused by various factors, ranging from outdated drivers to issues with compatibility.
In this section, we’ll provide reliable solutions to fix this error and help you successfully install the Ryzen Master Driver to improve the performance of your PC.
Key Takeaways
- Encountering the “Ryzen Master Driver not installed properly Error” during installation can be frustrating, but it’s a common issue.
- The error can be resolved by following the troubleshooting steps provided in this guide.
- Outdated drivers or compatibility issues are some of the common reasons for the installation error.
- Successfully installing the Ryzen Master Driver can significantly enhance the performance of your PC.
- Stay tuned for the next section where we’ll guide you through the process of troubleshooting the “Ryzen Master Driver not installed properly Error”.
Fix AMD Ryzen Master Driver not installed properly Error on Windows
Let’s learn how to fix this AMD Ryzen Master driver not installed issue in detail. Try the below fixes.
- Uninstall and Reinstall AMD Ryzen Master Utility
- Do Clean Reboot
- Check and Repair Your System Drivers
- Modify the Registry keys
Fix 1: Uninstall and Reinstall AMD Ryzen Master Utility
To fix the issue firstly, we will try uninstalling and reinstalling the application. To do this, follow the below steps.
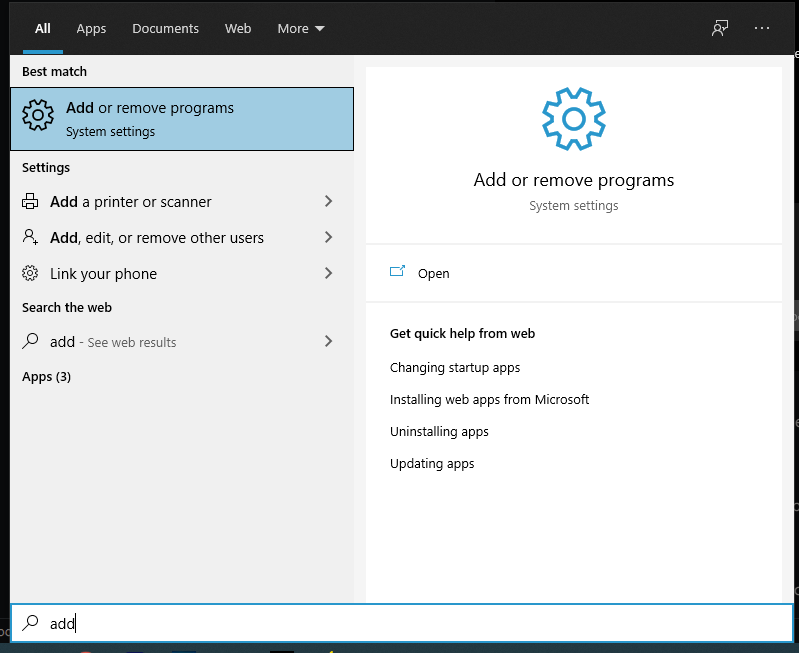
1. Open the Windows search bar and search for Add or Remove programs and open it.
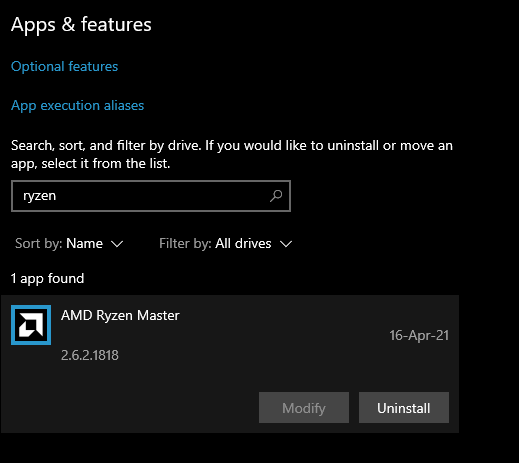
2. Now search for the AMD Ryzen Master program on the list as shown below and click on the Uninstall button to uninstall and remove all files related to the AMD Ryzen master utility. Or use the AMD cleanup Utility to uninstall all the AMD-related drivers.
3. After uninstalling it fully, restart the computer once and then download the latest version of AMD Ryzen Master Utility from the AMD website here by clicking on the download now button at the bottom of that page.
4. Now install it on a different directory and drive from your previous installation. This will avoid conflict with previous installation files or folders if it’s still present in the registry.
5. Now after installing the New AMD Ryzen Master Utility, restart your computer once again. Now the Ryzen master will open without the Ryzen Master Driver not installed properly error.
Fix 2: Perform a Clean Boot
One possible reason for the error is a conflict with another program or service. To root out the offending program, you can perform a clean boot. According to some reports, the GIGABYTE EasyTune program is known to conflict with the Ryzen Master Utility. If you have used or are using a GIGABYTE motherboard, make sure to check if you have EasyTune installed and remove it before performing a clean boot.
Here’s how to perform a clean boot:
- Press Win + R on your keyboard to open the Run window.
- Type msconfig and click OK.
- In the System Configuration window, navigate to the Services tab and check the box next to “Hide all Microsoft services.”
- Uncheck all the services except those belonging to your hardware manufacturers (e.g. Realtek, AMD, NVIDIA, Logitech, and Intel).
- Click OK to apply the changes.
- Open Task Manager by pressing Ctrl + Shift + Esc and navigate to the Startup tab.
- Disable any programs you suspect may be interfering with the Ryzen Master Utility, one at a time.
- Restart your PC.
If this fixes your issue, you can determine what caused the conflict by repeating the steps and disabling half of the programs and services at a time.
Fix 3: Check and Repair Your System Drivers
Another possible reason for the error is driver-related. This means that certain drivers are missing or something went wrong during their installation. To make sure your computer has the latest correct drivers, you can check them manually by visiting the manufacturer’s websites and downloading the latest correct driver installer. However, if you don’t want to manually update your drivers, you can use a smart driver updater like Driver Easy.
Here’s how to use Driver Easy:
- Download and install Driver Easy.
- Run Driver Easy and click “Scan Now.”
- Driver Easy will scan your computer and detect any problem drivers.
- Click “Update All” to automatically download and install the correct version of all missing or outdated drivers. (Note: This requires the Pro version. If you don’t want to upgrade, you can still download and install drivers with the free version, but you will have to do it manually.)
- After updating all the drivers, restart your PC and try to launch the Ryzen Master Utility.
If the latest drivers don’t fix your issue, move on to the next method.
Fix 4: Modify the Registry keys
Prior to 2021, you could fix the issue by deleting the AMDRyzenMasterDriverV13 and AMDRyzenMasterDriverV14 entries in the Registry. However, this solution no longer seems to work. Fortunately, some users have come up with a newer fix that involves modifying the Registry.
Here’s how to modify the Registry:
- Press Windows key + R to open the Run dialog box.
- Type “regedit” in the Run dialog box and press Enter to open the Registry Editor.
- Navigate to the following key: HKEY_LOCAL_MACHINESYSTEMCurrentControlSetControlClass{4d36e968-e325-11ce-bfc1-08002be10318}.
- Find the subkey with the name of the AMD Ryzen Master driver that is not installed properly (e.g. “0002”).
- Right-click on the subkey and select “Export”.
- Save the exported subkey to your desktop or another location of your choice.
- Delete the subkey that was exported.
- Right-click on the parent key (HKEY_LOCAL_MACHINESYSTEMCurrentControlSetControlClass{4d36e968-e325-11ce-bfc1-08002be10318}) and select “Import”.
- Select the exported subkey and import it.
- Close the Registry Editor and restart your computer.
- Reinstall the AMD Ryzen Master software and check if the error is fixed.
Note: Modifying the registry can cause permanent damage to your system if not done correctly. Make sure to back up the registry before making any changes. If you are not familiar with modifying the registry, it is recommended to seek assistance from a professional.
Fix 5: Checking System Compatibility and Requirements
Verifying that the system meets the minimum requirements for the AMD Ryzen Master Driver is essential. Users should ensure that their CPU model is supported, the operating system is compatible, and all necessary system updates are installed. Checking for any conflicting software or drivers can also help mitigate installation issues.
Fix 6: Verifying Hardware Connections and Settings
In some cases, hardware-related issues can cause the AMD Ryzen Master Driver installation to fail. Users should check that all CPU connections are secure and properly seated. Additionally, reviewing BIOS settings and ensuring they are correctly configured for the Ryzen processor can help resolve any compatibility issues.
Fix 7: Using System Restore to Resolve the Installation Error
If all else fails, utilizing the system restore feature can be an effective way to revert the system back to a previous state where the AMD Ryzen Master Driver was functioning correctly. This method allows users to undo recent changes or system updates that may have caused the installation error.
Troubleshooting Ryzen Master Driver Installation Error
If you’re experiencing the “Ryzen Master Driver not installed properly Error,” don’t worry, it’s a common issue that can be fixed with a few simple troubleshooting steps. Below, we’ve provided several solutions to resolve this error and ensure a successful installation of the Ryzen Master Driver. Follow these steps to fix the problem:
Fixing Ryzen Master Driver Installation Error
- Restart your PC: Sometimes, a simple restart of your computer can fix the installation issue. After you restart, try to install the driver again.
- Uninstall the previous version of Ryzen Master Driver: If you have a previous version of the driver installed, remove it from your computer and then try to install the new version.
- Disable antivirus and firewall: Your antivirus or firewall may be preventing the installation of the Ryzen Master Driver. Try temporarily disabling them and then attempt to install the driver again.
- Check system compatibility: Make sure that your system meets the minimum requirements for the Ryzen Master Driver installation. Ensure you are downloading and installing the correct version of the driver for your system.
- Install in safe mode: Occasionally, some applications running on your computer may interfere with the Ryzen Master Driver installation. Try installing the driver in safe mode where only necessary applications are running.
- Update your operating system: Ensure your operating system is up to date with the latest updates as this could be impacting the installation of the Ryzen Master Driver.
By following these solutions, you can resolve the “Ryzen Master Driver not installed properly Error” and successfully install the Ryzen Master Driver.
Troubleshooting Ryzen Master Driver Installation Issue
During the installation process, you may encounter various issues. To help you troubleshoot and overcome these obstacles, we’ve detailed some common issues and their solutions below:
| Issue | Solution |
|---|---|
| Ryzen Master Driver installation freezes or crashes | Try restarting your computer and disabling antivirus and firewall programs temporarily. Ensure the correct version of the driver is being installed. Install the driver in safe mode. |
| Driver does not load or start at boot | Try uninstalling and reinstalling the driver. Check if the driver is set to start automatically at boot-up. Disable any conflicting programs. |
| Driver not recognized by the system | Ensure you have installed the correct version of the driver for your system. Try reinstalling the driver or updating your operating system. |
By following these tips and solutions, you can successfully resolve the “Ryzen Master Driver not installed properly Error” and overcome any installation issues you may encounter.
Troubleshooting Ryzen Master Driver Installation Error
After encountering the “Ryzen Master Driver not installed properly Error,” it’s crucial to troubleshoot the issue and try fixing it. Here are some common Ryzen Master Driver installation troubleshooting steps:
- Download the Latest Version: One of the most common reasons for the installation error is using an outdated version of the Ryzen Master Driver. Ensure that you have the latest version of the driver downloaded from a reliable source.
- Disable Antivirus: Your antivirus software may be preventing the installation of the Ryzen Master Driver. Disable your antivirus temporarily to complete the installation process, and enable it once the process is complete.
- Run as Administrator: Running the installation program as an administrator may help you overcome any access-related issues and help complete the installation process.
- Check for Compatibility: Ensure that your system meets the minimum requirements for the Ryzen Master Driver. Check the driver’s technical specifications and compare them to your system’s specifications.
- Clean Boot: Perform a clean boot of your system to disable any third-party software that may interfere with the installation process. This will help you identify the root cause of the issue and help you resolve it.
If none of the above solutions work, you can contact the manufacturer’s support team for additional help with your Ryzen Master Driver installation issues and fixes. By addressing the installation errors, you can enjoy improved system performance and take full advantage of the Ryzen Master Driver’s features and functions.
Conclusion
By troubleshooting the “Ryzen Master Driver not installed properly Error” and successfully installing the driver, you can enhance the performance of your PC. The Ryzen Master Driver offers a range of features that can optimize your PC’s performance and improve its efficiency.
Remember to follow the step-by-step instructions provided in this guide and reach out for additional support if needed. With the Ryzen Master Driver installed, you can experience the full potential of your PC and enjoy a seamless computing experience.
FAQ
How do I fix the Ryzen Master Driver not installed properly Error?
To resolve this error, you can follow these steps: 1. Ensure that you have downloaded the latest version of the Ryzen Master Driver from the official website. 2. Disable any antivirus software temporarily during the installation process. 3. Run the installer as an administrator by right-clicking on the installer and selecting “Run as administrator.” 4. Make sure that your system meets the minimum requirements for installing the Ryzen Master Driver. 5. Restart your computer after the installation completes to apply the changes.
What should I do if I encounter issues during the Ryzen Master Driver installation?
If you encounter any issues during the installation of the Ryzen Master Driver, you can try the following solutions: 1. Check if your system meets the minimum requirements for installing the driver. 2. Update your operating system to the latest version. 3. Disable any third-party software that may interfere with the installation process. 4. Run a system scan to check for any conflicting drivers or software. 5. Contact the official support team for further assistance.
How can the Ryzen Master Driver enhance the performance of my PC?
The Ryzen Master Driver offers several features to optimize your PC’s performance: 1. It allows you to overclock your CPU for improved speed and performance. 2. You can monitor and adjust the voltage and temperature of your CPU for better stability. 3. The driver provides detailed analytics and performance metrics, helping you identify areas for improvement. 4. It enables you to customize power settings to balance performance and energy efficiency. 5. The Ryzen Master Driver ensures compatibility with the latest AMD processors, maximizing their capabilities.