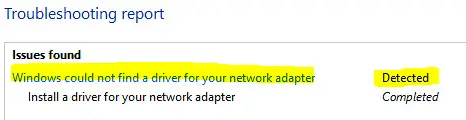
We always need a connection between the operating system and the hardware for proper functioning of the hardware, and that is what device drivers do. When you face network related problems, you might mostly run the inbuilt Network Adaptor Troubleshooter. “Windows could not find a driver for your network adapter” is the error message that you receive if the troubleshooter finds a problem but is not able to fix it on its own.
How To Fix Windows could not find a Driver for your Network Adapter
Read the methods mentioned below to solve this Driver error quickly and precisely. You can follow them in any order as you deem fit, it will definitely help you fix the problem of windows could not find a driver for your network adapter.
1. Updating Network Adapter driver
- Open the Start search box in your windows computer by pressing the Start button on keyboard.
- Type devmgmt.msc or Device Manager.
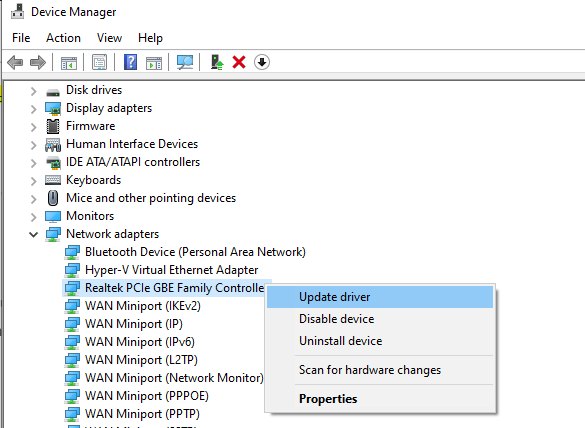
- The Device manager application that will show up in the search results. Hit Enter to open the Device Manager window.
- Find Network Adaptor Drivers, and click on the arrow to expand the list.
- Now manually Update Driver by right clicking on each, one by one like shown in the screenshot below.
- After you have updated the drivers, then Reboot your computer.
2. Run Hardware and Devices Troubleshooter
- Hardware and Devices troubleshooter can help diagnose and fix common problems related to hardware.
- You can go to Start > Settings > Updates and Security > Troubleshoot Menu option.
- Now hit the Troubleshoot button.
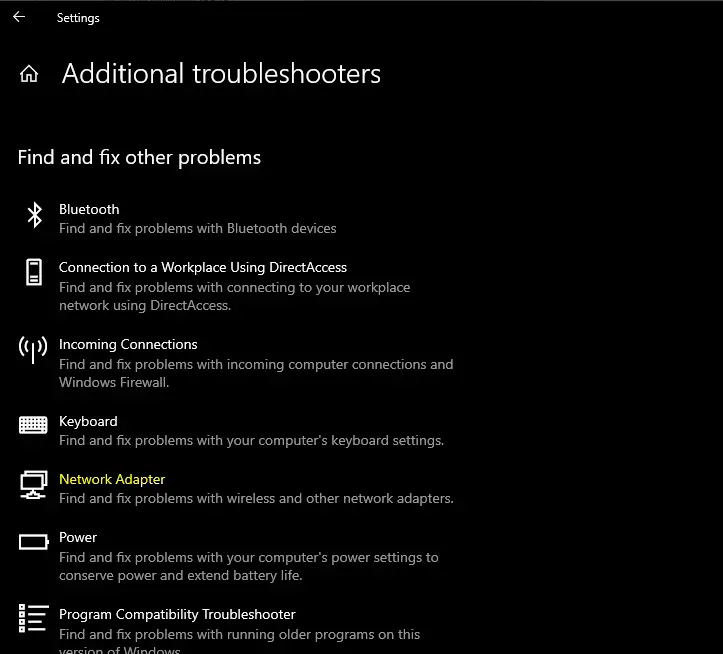
- Select the Hardware and Devices troubleshooter, run it. If you are using latest version of Window 10, then click on the Additional Troubleshooters and choose the Network Adapter troubleshooter option.
- Reboot to see if the “Windows could not find a Driver for your Network Adapter problem” has been resolved.
3. Uninstall and then Reinstall Network drivers
- You can straightaway uninstall the driver for each network adaptor by reaching the device manager as mentioned in the first step.
- Now to reinstall, either use the OEM website, or the manufacturer’s website or any safe and reliable place from the internet. Download the relevant drivers, move them to your PC with the help of a USB, and install.
- Note that you have the driver software in your USB drive before you make the uninstall from your PC.
- You will need to restart your computer to check if the problem still persists or is now solved.
4. Run Network Adapter Troubleshooter again
It is good to try the Network Adaptor Troubleshooter once again at this stage if the problem still persists.
- To open the Troubleshooter, Go to Start > Settings > Updates and Security > Troubleshoot
- Select Network Adaptor Troubleshooter, run it.
- Reboot your PC to check if you were able to solve the issue. Else, the below mentioned step must be able to help you under all circumstances.
5. Do A System Restore
If nothing of the above seems to work, you must roll back to the last point where your system ran properly and you did not get the error message “windows could not find a driver for your network adapter”.
You can do this by performing a system restore which will undo any changes that have been made by any recently installed programs or applications.
Hope that our above solutions has helped you to fix the error “Windows could not find a driver for your network adapter” easily. You can write back to us in the comments section below and do share this post if you find it helpful!

He is the founder of howtodoninja.com and is an experienced tech writer and a cybersecurity enthusiast with a passion for exploring the latest technological advancements. He has 10 years of experience in writing comprehensive how-to guides, tutorials, and reviews on software, hardware, and internet services. With an interest in computer security, he strives to educate users by writing content on how to use technology, and how to also protect their smart devices and personal data from cyber threats. He currently uses a Windows computer, and a Macbook Pro, and tests hundreds of Android phones for writing his reviews and guides.