When I set up a new Windows computer, I always create many separate partitions on my hard disk or SSD to organize my files better. In this tutorial, I am going to use free partition software to create partitions in our Windows 12 system.
What is Partition Wizard?
Partition Wizard is a reliable third-party partitioning software that enables you to conveniently split your hard drive into distinct partitions while ensuring the retention of all your data. By using Partition Wizard, you can resize, move, create, and delete partitions, and even clone your partition or drives.
Steps to Create Partitions using Partition Wizard in Windows 12

Follow the below steps to create partitions on your Windows computer.
Step 1: First, download and install MiniTool’s partition software on your computer.
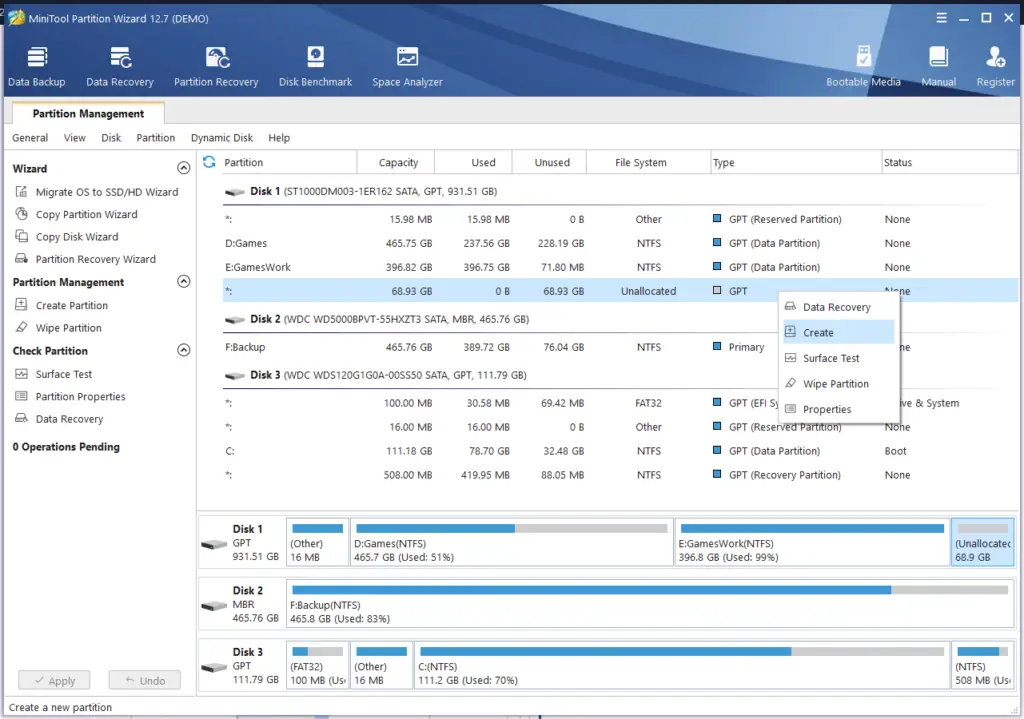
Step 2: Once the installation is completed, open the Partition Wizard software and choose the Partition management screen.
Step 3: In this screenshot below, you can see an unallocated space of 68.93 GB in Disk 1. Now right-click on the unallocated space and select the “Create” button.
Step 4: In the “Create New Partition” window, enter the Partition Label ( Here I am using Movies ) and specify the size of the partition by using the Size slider, assign a drive letter or mount point, and select a file system as NTFS or other formats.
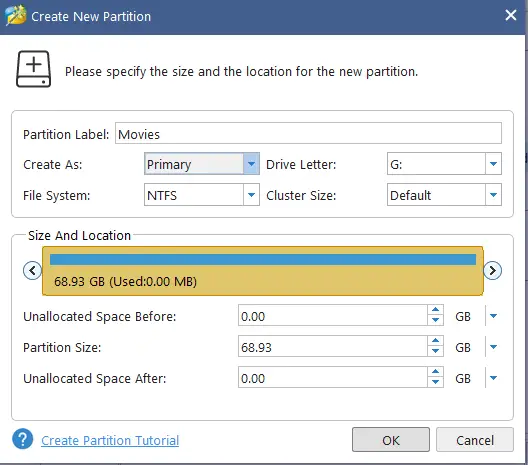
Step 5: When you are done, click “OK” to create the partition.
Step 6: Now you should click on the “APPLY” button on the left side of the software and confirm on the Apply changes popup window.

Step 7: Now Partition Wizard will then create the new partition and format it with the file system you specified. You can repeat these steps to create additional partitions if you need them.
Benefits of Creating Partitions in Windows 12
Creating partitions in Windows 12 has several benefits. First, it enables you to organize your files and data more effectively. You can create separate partitions with names such as Games, Movies, Documents, Office Files, etc. for organizing your data better and it also makes it easy to find files.
Second, creating partitions can improve the performance of your computer. When you install Windows and programs, they write data to your hard drive in a scattered way. This makes it slower to access files because the read/write heads of the hard drive have to move around to find the data.
Partitioning can significantly enhance your data security. Storing all your data on a single large partition can make it vulnerable to corruption or virus attacks, potentially resulting in the loss of all your data. However, by creating distinct partitions, you can isolate your data and shield it from these types of issues.
Tips for Managing Partitions with Partition Wizard in Windows 12
Here are some tips for managing partitions with Partition Wizard in Windows 12:
- Always back up your data before making any changes to your partitions.
- Be careful when resizing or moving partitions, as this can sometimes cause data loss.
- Should you need to relocate your operating system to a different partition, you can utilize Partition Wizard’s “Migrate OS to SSD/HD” feature.
- Use the “Surface Test” feature in Partition Wizard under the Check Partition option on the left menu options to check your hard drive for bad sectors before creating new partitions.
- If you’re not sure about the size of the partition, start with a smaller partition as you can expand it later easily.
Troubleshooting Partition Creation Issues in Windows 12 with Partition Wizard
- Before creating a partition, check whether you have enough unallocated space on your hard drive.
- Check that your hard drive is not encrypted or protected by a password, as this can prevent Partition Wizard from creating partitions.
- If you receive an error message, check the Partition Wizard documentation for help interpreting the error code.
I hope you were able to create a partition on your disk using the partition wizard easily. Do let us know if you face any problems while creating a partition in your Windows computer.